
The Situation
In todays internet website hosting complexity goes from simple to complex very quickly. With the multitude of requirements scaling from just a webpage to requiring auditing, global content delivery, logging, low latency, security, and on and on. In this article we will explore one AWS serverless solution that result in a low cost, performant, and secure delivery of a static content website.
Disclaimer
Like all things engineering this article is a trade off between brevity and complexity. As such this article does not cover AWS IAM user configuration, Terraform provider access to AWS, CloudFront WAF, nor request routing. Please consule your friendly cloud engineering group before deploying this solution as a production workload. Alternatively, reach out to me via me[at]davidjeddy[dot]com for consulation.
Part 1 : Preperation
Preflight Requirements
- https://www.linux.org/ – Localhost environment
- https://aws.amazon.com/ – Cloud host vendor
- https://www.terraform.io/ – Infrastrucutre as Code (IAC) tool
- https://k6.io/open-source/ – Load testing tool
Git Project Directory Structure
Having worked on many different sized projects, ranging from imple static webpages to global scale streaming entertainment portal projects, having a robust and easy to understand project strucuture is a must. For IAC project I use the following pattern and it has served me well so far.
cd /localhost_path_to_projects/project_name/
.
├── iac
│   └── aws
│       └── prd
│           └── eu-west-1
│               └── la8o # random string for entropy
│           └── global
│               └── iam
├── testing
│   └── k6
│       ├── logs
│       └── results
└── web_app
    ├── images
    ├── javascripts
    └── styles
Take note of the structure under the iac directory. la8o is what I call the entropy string. This string is appended to resource names and tags to prevent name value collisions. This enabled multiple instances of an application to be deployed into the same account and region. Additionally, by having each deployment in its own directory it reduces the number of resources impact by change; or in tech terms, it reduces the blast radius
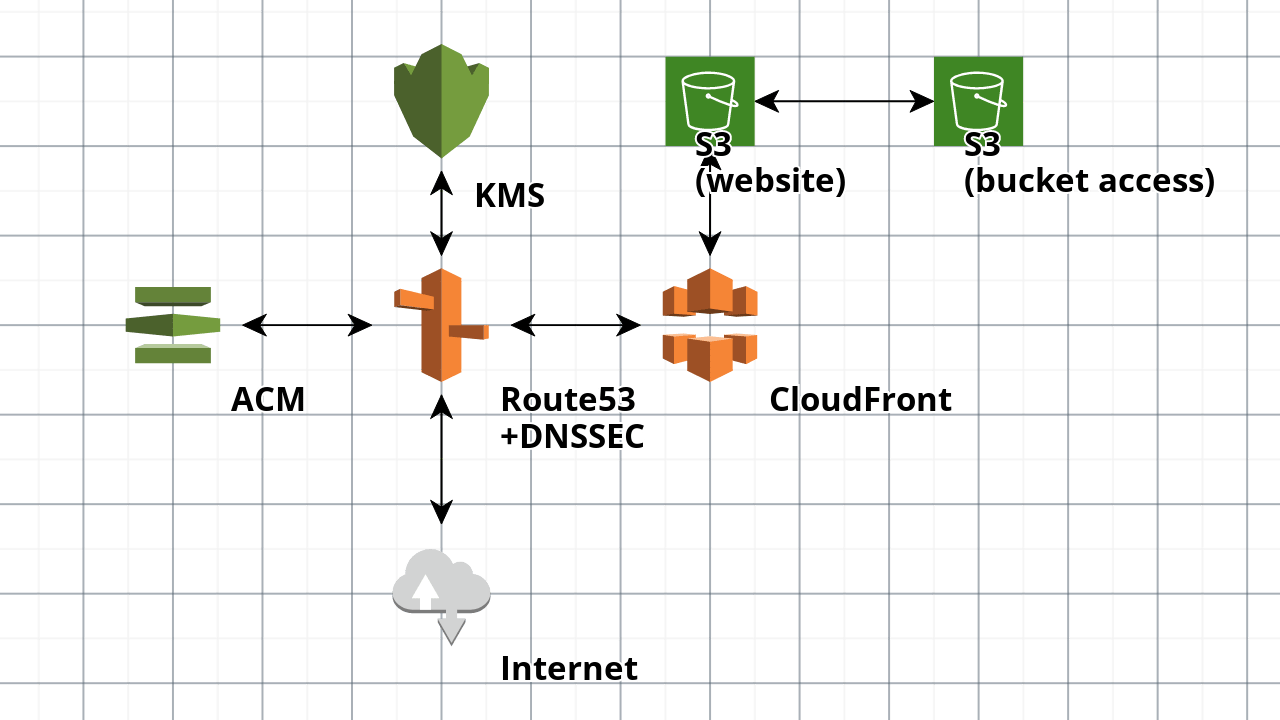
Infrastructure Architecture
This solution depends on five core AWS services. Since we are doing a serverless solution we do not need the VPC or any of the related network resources. (My recommendation is to delete the default VPC as a good security measure.)
- ACM for TLS – security
- CloudFront for CDN – hosting
- KMS for DNSSEC – security
- Route53 for DNS – routing
- S3 for hosting – origin
IAC Configuration
Inside of the ./iac/aws/prd/us-east-1/la80 deployment we will want to first configure a couple of providers due to how Route53 and Terraform function together.
# Default provider
provider "aws" {
  profile                  = "REDACTED"
  region                   = var.region

  default_tags {
    tags = var.tags
  }
}

# Route53 DNS query logging
provider "aws" {
  alias = "us-east-1"
  profile                  = "REDACTED"
  region                   = var.region

  default_tags {
    tags = var.tags
  }
}
After the providfers we need to pin the provider and Terraform versions.
# terraform.tf
terraform {
  required_providers {
    aws = {
      source  = "hashicorp/aws"
      version = "~> 5"
    }
  }

  required_version = "~> 1.6"
}
With that out of the way we are now ready for Cloud Resource Configuration.
Cloud Resource Configuration
As one of the pillars of good software: do not reinvent the wheel, we are going to leverage some community modules from the CloudPosse GitHub organization to help deploy the resources for our project.
Setting the Variable Values
In my mental model variables are any data points that are used more than once within a module. Domain name, random string, application name, etc. So lets create those first.
# variables.tf

variable "delimiter" {
  default     = "-"
  type        = string
  description = "Character used as the word separator when spaces are not valid"
}

variable "domain_name" {
  default     = "example.com"
  type        = string
  description = "Domain name of project"
}

variable "name" {
  default     = "example"
  type        = string
  description = "Name of the project"
}

variable "namespace" {
  default     = "ee"
  type        = string
  description = "Project namespace"
}

variable "random_string" {
  default     = "la8o"
  description = "(required) Entropy string"
  type        = string
}

variable "region" {
  default     = "us-east-1"
  description = "Default region the AWS provider should execute against."
  type        = string
}

variable "tags" {
  default     = {
    Contact = "David J Eddy"
    Version = "0.2.0"
  }
  type        = map(string)
  description = "(optional) describe your variable"
}

variable "stage" {
  default     = "prd"
  type        = string
  description = "The stage of this deployment"
}

variable "web_path" {
  default     = "../../../../../web_app"
  type        = string
  description = "Path where web assets are located"
}
For the slake of ease of use lets create a local for the Name value. This will come in handy as we will not need to copy/paste the same long line of configuration onto multiple resource configurations.
locals {
  name = join(var.delimiter, [var.stage, var.namespace, var.name, var.random_string])
}
DNS via Route53
Next we will configure our IAC to know we have a domain. In this example the domain was purchased via Route53 so minimal configuration is needed. This helps seperate management of the domain from the usage of the domain, reducing the blast radius if something goes bad.
# route53.tf
resource "aws_route53_zone" "this" {
  name = "YOURDOMAIN.TLD"
}
TLS via ACM
With the domain functional and now accessible by Terraform we want to encrypt all traffic going to it. For this we create a TLS certificate using AWS ACM.
# acm.tf
module "acm_request_certificate" {
  source  = "cloudposse/acm-request-certificate/aws"
  version = "0.16.3"

  domain_name = var.domain_name
  name        = local.name
  zone_id     = aws_route53_zone.this.zone_id
}
CDN via CloudFront
# cloudfront.tf
module "cdn" {
  source  = "cloudposse/cloudfront-s3-cdn/aws"
  version = "0.92.0"

  acm_certificate_arn = module.acm_request_certificate.arn
  name                = local.name
  parent_zone_id      = aws_route53_zone.this.zone_id

  dns_alias_enabled    = true
  encryption_enabled   = true
  geo_restriction_type = "none"
  ipv6_enabled         = true

  aliases = [
    var.domain_name
  ]
}
File Upload via Terrform S3 Bucket Object
resource "aws_s3_bucket_object" "text_html" {
  for_each = fileset("${var.web_path}/", "*.html")

  content_type           = "text/html"
  server_side_encryption = "AES256"

  etag   = filemd5("${var.web_path}/${each.value}")
  source = "${var.web_path}/${each.value}"
  key    = each.value

  bucket = module.cdn.s3_bucket
}

# repeat for each mime type files to be uploaded to the origin
# ...
Deploy
With all the required configuration and code in place we are ready to deploy.
terraform init
terraform plan
Check the output and ensure there are no errors. When ready, apply
terraform applyThe apply will take some time while the TLS cert if validated and the CDN is deployed. If all goes well we should see a green output. If you get an error about a timeout, run again.
Testing and Validation
With all the resource deployed we should be able to make a request to the domain and recieve a HTTP 200 return code.
Now for the real testing fun. Lets run a little but of a load test using k6. Add the following to ./testing/k6:
import http from 'k6/http';

export const options = {
    scenarios: {
        constant_request_rate: {
            executor: 'constant-arrival-rate',
            rate: 2500,
            duration: '30s',
            preAllocatedVUs: 20, // how large the initial pool of VUs would be
            maxVUs: 100, // if the preAllocatedVUs are not enough, we can initialize more
        },
    },
    tlsVersion: 'tls1.2',
};

export default function() {
    http.get(`http://${__ENV.HOSTNAME}/`);
}
cd /root_of_project/testing/k6
k6 run \
--env HOSTNAME=YOURDOMAIN.TLD \
--log-output file=$(date +%s).log \
--quiet \
get.js \
| tee $(date +%s).logOnce completed the output should look something similar to the following:
     data_received..................: 83 MB  1.4 MB/s
     data_sent......................: 1.4 MB 23 kB/s
     dropped_iterations.............: 68587  1143.046865/s
     http_req_blocked...............: avg=7.26ms   min=0s      med=5µs     max=3.34s    p(90)=8µs      p(95)=24µs
     http_req_connecting............: avg=4.83ms   min=0s      med=0s      max=3.22s    p(90)=0s       p(95)=0s
     http_req_duration..............: avg=221.45ms min=32.56ms med=90.46ms max=19.55s   p(90)=285.71ms p(95)=329.36ms
       { expected_response:true }...: avg=220.94ms min=32.56ms med=89.44ms max=19.55s   p(90)=285.7ms  p(95)=314.96ms
     http_req_failed................: 3.07%  ✓ 394         ✗ 12420
     http_req_receiving.............: avg=96.1ms   min=9µs     med=69µs    max=19.3s    p(90)=124.83ms p(95)=130.6ms
     http_req_sending...............: avg=251.74µs min=3µs     med=19µs    max=438.32ms p(90)=34µs     p(95)=55µs
     http_req_tls_handshaking.......: avg=0s       min=0s      med=0s      max=0s       p(90)=0s       p(95)=0s
     http_req_waiting...............: avg=125.1ms  min=32.5ms  med=90.4ms  max=5.26s    p(90)=195.41ms p(95)=249.71ms
     http_reqs......................: 12814  213.553626/s
     iteration_duration.............: avg=457.43ms min=76.92ms med=294ms   max=19.64s   p(90)=582.88ms p(95)=1.77s
     iterations.....................: 6405   106.743482/s
     vus............................: 8      min=8         max=100
     vus_max........................: 100    min=100       max=100
What does this all mean? The target domain response latency averages around 460ms with a P90 latency of 580ish ms. Not bad for a website that has TLS and will cost only dollars a month to host.
Conclusion
With a bit of configuration and code we now have a TLS secured serverless static website host using Cloud serverless functionality yet costing mear dollars a month.
Additional Resources
- https://aws.amazon.com/certificate-manager/
- https://aws.amazon.com/route53/
- https://aws.amazon.com/cloudfront/
- https://aws.amazon.com/kms/
- https://aws.amazon.com/s3/
- https://www.terraform.io/
- https://k6.io/
Bonus
- Add static analysis tools such as checkov, KICS, tflint, tfsec, trivy, and other analysis tooling
- Add automatie API documention via terraform-docs
- Use remote state storage such as AWS S3/DynamoDB, Terraform Cloud, or Spacelift
- Move all the configuration to into a shared module… oh, wait. I did 😀